
Gingerbread House
Prep Time
Cook Time
Total Time
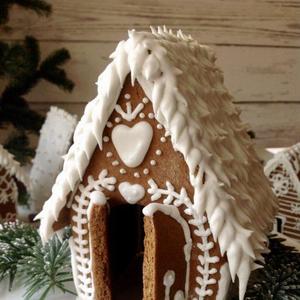
Christmas means gingerbread and gingerbread houses, what fun it is to create and decorate these festive houses. I think I found the perfect recipe for Gingerbread Houses in the Pastry Queen book by Rebecca Rather. This recipe makes a dough that is dense and sturdy, easy to roll and cut, and bakes nicely with little puffing or spreading. And the fragrance of gingerbread wafting through the house while it’s baking is deliciously amazing. I did alter the recipe a bit by increasing the spices (cinnamon nutmeg and salt) and decreasing the amount of cloves. This dough takes a bit more time than a traditional dough but I think it is actually easier to make and work with. The sugars and spices are first heated on the stovetop to a bubbling boil. Then butter is added to create a butter and sugary base, and then the flour is stirred in. That’s it. Let the dough sit in the fridge overnight to chill and you’re ready to bake. Melted the butter and sugar creates a gingerbread dough that is denser and chewier with less rise, basically a non-leavened dough despite including the baking soda which helps the cookies crisp. Versus creaming the butter and sugar to capture air bubbles which would produce a tender dough with a more cake-like leavened texture. This gingerbread dough also makes an excellent rolled and cutout cookie; however, you would want to bake for less time to have a bit softer but still crisp cookie. The dough for gingerbread houses is typically baked longer to make the house pieces strong and sturdy. Many recipes suggest rolling the dough to a thickness of ¼ inch to create sturdy gingerbread house pieces. This thickness obviously uses quite a bit of dough. I experimented with ¼-inch and this does make a nice sturdy house with a longer bake time. I also rolled the dough to ⅛-inch which certainly uses less dough and I found these houses were very sturdy, yet lighter in weight, making them seem a bit more delicate. Last I tried 3/16-inch, right in the middle of ⅛ and ¼-inches, and I think this thickness hits the mark perfectly. The houses are extremely sturdy with plenty of dough to use for more than one house. Tip: if you have rolling pin rings this is the time to use them to roll the dough to an even thickness. Royal icing is the edible “glue” that holds the houses together, adheres candy pieces, and is used for beautiful decorations. I’ve provided my favorite royal icing recipe below. It is a thick icing to act as a mortar to hold the house pieces together. Even though you may only be making gingerbread houses for display and not eating, it’s nice to have everything taste yummy, just in case you do want to eat! I prefer using actual egg-whites over meringue powder just because it makes the royal icing tastes better; it’s best to use liquid egg-whites which have been pasteurized to destroy any salmonella bacteria vs using fresh egg-whites. Last are the decorations. We had a gingerbread party with our small grandchildren and they loved putting all the candies on the houses. This is the part where you can go wild and buy all the candies you want for decoration. Or, my favorite, is to just decorate with royal icing using minimal to no candies for beautiful all-white decoration. Click here for more Gingerbread House Tips and Photos